This demo is for people working at TSG as an example on how to make a web experiment with JsPsych 6. Knowledge of html, mounting network folders and Javascript is expected.
Make a folder in titus.uci.ru.nl:/var/www/exp/web. For instance named demo. It will be reachable at https://exp.socsci.ru.nl/demo. Make sure it has you as owner and tsg as group. Make it chmod 775, so that tsg can write it and the world can read it.
Download jspsych 6 and unzip in this folder
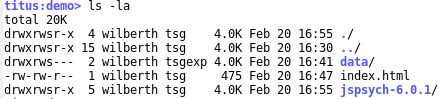
Make a subfolder data which has you as owner and tsgexp as group. Make it chmod 770, so that tsg and the webserver (which is in tsgexp, but not in tsg) can write it and the world cannot read it. It will look somewhat like this (there is no index.html yet):
Save the following text as index.html in the folder:
<!DOCTYPE html>
<html>
  <head>
    <title>TSG JsPsych 6 Demo experiment</title>
    <script src="jspsych-6.0.5/jspsych.js"></script>
    <script src="jspsych-6.0.5/plugins/jspsych-html-keyboard-response.js"></script>
    <link href="jspsych-6.0.5/css/jspsych.css" rel="stylesheet" type="text/css"></link>
  </head>
<body>
</body>
<script>

var hello_trial = {
  type: 'html-keyboard-response',
  stimulus: 'Hello world!'
}

jsPsych.init({
  timeline: [hello_trial]
})

</script>
</html>
Make sure the panel mechanism gives a ppn url parameter. The ppn=123 will be parsed by demo.html:
var ppn = jsPsych.data.urlVariables()['ppn']
One of the tricky parts of JsPsych is to save data. One has to allow the webserver to add files, but nothing else. These files are therefore 'write only'. The user can write them but not read them back. We make a file save.data to receive this data:
<?php
$post_string = file_get_contents('php://input');
$post_data = json_decode($post_string, true);

// parse filename
if (strlen ($post_data['filename']) == 0){
	print("failure, no filename\n");
	exit();
}
$filename = "data/".$post_data['filename'];

if (strpos ($filename, "..")!==false){
	print("failure, unsafe filename\n");
	exit();
}

// write the file to disk
file_put_contents($filename, $post_string.",\n", FILE_APPEND | LOCK_EX);
print("success: " . $post_string);
?>
and add a data handler to the demo.html file:
function saveData(data){
	data['ppn'] = ppn
	data['filename'] = "data_"+ppn+".dat"
	var xhr = new XMLHttpRequest()
	xhr.open('POST', 'save_data.php'); // 'write_data.php' is the path to the php file described above.
	xhr.setRequestHeader('Content-Type', 'application/json');
	xhr.onload = function() {
		if(xhr.status == 200){
			console.log("server response: " + xhr.responseText)
		}
	}
	xhr.send(JSON.stringify(data))
}
and make sure this handler is called after every trial:
jsPsych.init({
	[...]
	on_trial_finish: saveData,
	[...]
})
It is a nuisance having to run the entire experiment each time. Let's make a file start.html where we can access the experiment in parts. Check for the parts chosen in demo.html (replace the existing structure with this):
hello = {
	type: 'html-keyboard-response',
	stimulus: 'Hello, press any key to continue'
}

instructions = {
	type: 'external-html',
	url: 'content/instructions.html',
	cont_key: 10, // enter
	cont_btn: 'next',
}

intro = {
	timeline: [hello, instructions],
	conditional_function: function(){ return jsPsych.data.urlVariables()['intro']==undefined },
}

trial0 = {
	type: 'html-keyboard-response',
	stimulus: 'Trial0, press any key to continue',
}

trial1 = {
	type: 'html-keyboard-response',
	stimulus: 'This is the end. We continue with a survey',
}

trials = {
	timeline: [trial0, trial1],
	conditional_function: function(){ return jsPsych.data.urlVariables()['trials']==undefined },
}
<?php

// set the default timezone if not set at php.ini
date_default_timezone_set('Europe/Amsterdam');

use Sabre\DAV;

// The autoloader
require '../admin/SabreDAV/vendor/autoload.php';

$rootDirectory = new DAV\FS\Directory('content');
$server = new DAV\Server($rootDirectory);

function myHandler($path, &$data, \Sabre\DAV\ICollection $parent, &$modified) {
  if(stripos($path, '.php')!==FALSE) {
    error_log("suspected php file refused: ".$path);
    return FALSE;
  }
}
$server->on('beforeCreateFile', 'myHandler');

// If your server is not on your webroot, put it here
$server->setBaseUri('/demo/webdav.php');

// This ensures that we get a pretty index in the browser, but it is optional.
$server->addPlugin(new DAV\Browser\Plugin());

// All we need to do now, is to fire up the server
$server->exec();

?>
AuthName "Demo"
AuthType Basic

## for file authentication
#AuthBasicProvider file
#AuthUserFile /var/www/exp/var/authentication/passwords # readable by webserver
#Require valid-user

## for ldap authentication
#AuthBasicProvider ldap
#AuthLDAPURL "ldaps://ldap.authenticatie.ru.nl:636/o=ru,c=nl"
#AuthLDAPBindDN "as given by isc"
#AuthLDAPBindPassword "as given by isc"
#Require ldap-user u123456

## for both file and ldap authentication
AuthBasicProvider file ldap

AuthUserFile /var/www/exp/var/authentication/passwords # readable by webserver
Require user john pete # multiple requires are interpreted as "require any"

AuthLDAPURL "ldaps://ldap.authenticatie.ru.nl:636/o=ru,c=nl"
AuthLDAPBindDN "as given by isc"
AuthLDAPBindPassword "as given by isc"
Require ldap-user u123456 s1234567 # John Pete